Building Forms to Insert Data into a Database

Return to Using the FrontPage Database Wizards

The following directions will show you how to build a form and to have FrontPage save what is put into the form into a database.
 
Build a form.

Open FrontPage.  Open Webs.  Open http://vygotsky.ced.appstate.edu/advweb as your web (using the user id and password I gave you in class).  Open your folder, then create a new page.  

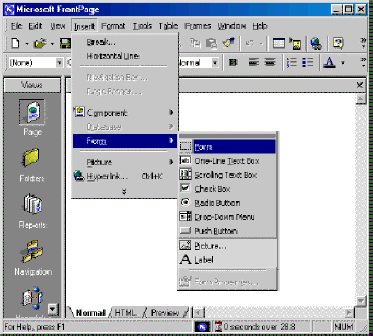
Next, you want to insert a form.  To do this, select Form from the Insert menu, then choose Form on the slide-out screen.  
Lets take a moment to look at the various components of a form:
  • Form - A blank form with a Submit & Reset button.
  • One-Line Text Box - a textbox, for entering text or number values of any type (e.g., a place to type in a name).
  • Scrolling text box - For entering multiple lines of text (e.g., for entering comments).
  • Check Box - For a list of choices (e.g., Do you use your computer at home? at work? at school? -- check all that apply). 
  • Radio Button - for mutually exclusive choices (e.g., Are you Male? or Female? -- can't have both radio buttons selected at once.
  • Drop down menu - For choices from a list of pre-determined selections (e.g., choose the state in which you live from the following list:).
  • Push Button - a button (usually grey) that, when clicked, "indents" then asks the form to perform an action (e.g., "Submit" button).
  • Picture - Put an image on a form.
  • Label - To add a label to a form (e.g., "First Name").

Each one of these, when added to your form, becomes a "field."
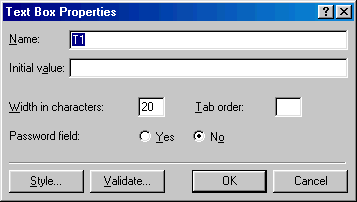
 

Build your form, and be sure to add a description to each field so the user will know what you are asking them.  You must always name EACH field in your form.  To do this, right-click on the field, and select Form Field Properties.  

Tip: It is probably a good habit to get into, when naming your fields, to leave out any spaces.  So "First Name" would be "FirstName", and so on.

Form Field Properties
  • By default, text boxes are named T1.  You should rename each field with a name that makes more sense (e.g., "FirstName").  
  • You can set an initial value, which is what will appear in the field when the page is first loaded (e.g., "Put your first name here").
  • You can also set the width, tab order, and whether or not it is a password field (if it is, then whatever the user types will be displayed within the textbox as asterisks, just a password field).
  • Another Tip: When using radio buttons, consider giving related radio buttons the same name, but different values.  For example, if I add two radio buttons for "Gender," one for "Male" and the other for "Female," I might right-click on each, name EACH "gender," but give the initial value of "male" to one and "female" to the other.  This way, the info gets passed on to the database (as opposed to "ON," which is less meaningful), and also it prevents the user from mistakenly selecting both male AND female. 
 
Right click on the Form to get to Form Properties.
 
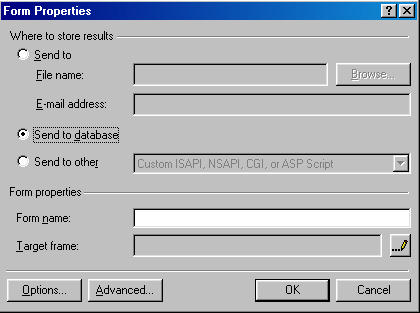
Right-click anywhere within the form to get the pop-up menu.  Select Form Properties from the menu.  In form properties click on the "Send to database" selection.

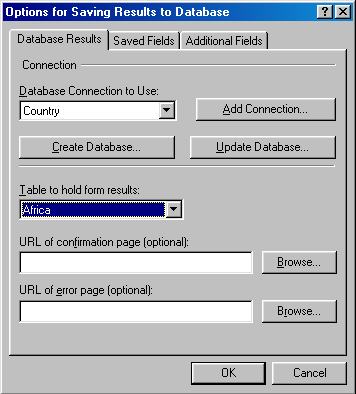
2. Click on the "Options..." button.
 
If you already have a database and a connection to that database you will find the database connection listed and the tables in that database listed.  You need to select the appropriate database and table.  If you don't have a database in your web already you can have FrontPage create one by clicking on the "Create Database..." button.  A database will be created using the form field names in your form as database fields and a connection to that database will be established.  If you have a database in your web but have not established a connection to it you can click on the "Add Connection..." button (see Creating a Database Connection).

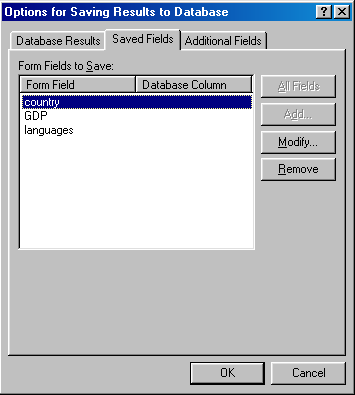
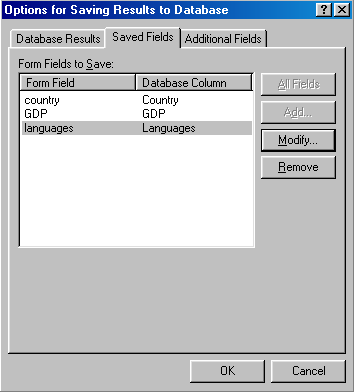
3. If you are inserting data into an existing form,* click on the "Saved Fields" tab.

*If you had FrontPage create a database for you then you are done.  Your form will automatically insert data into the database you just created. (If prompted to do so, right-click on your file (or choose "Save As") and rename your file using a .ASP extension).

 
You need make sure the input from your form fields gets into the correct database fields.  You will see a list of the form fields that are in your form.  Highlight a form field.

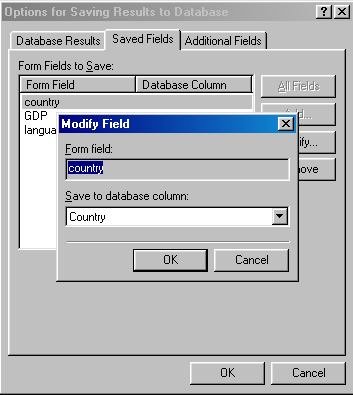
4. Click on the "Modify..." button.
 
The form field you highlighted will be named in the "Form field:" box.  Below that will be a "Save to database column:" dropdown menu.  All the data fields available in the database table you are working with will be listed in this menu.  Click on the database field you want the information entered in the web page form field to go to.

When you are done, all of your form fields will have a database column associated with it.  In this example we made the form field names the same as the database fields but they can have different names.  It is easier, though, if you keep the names consistent.