Displaying Results from a Database
Return to Using the
FrontPage Database Wizards
You can build an interactive web
page that allows you to display the contents of your database by choosing Database from
the
Insert menu, then selecting Results from the slide-out window.
The following instructions assume that you have a
database in your web and that you have a "database connection" already
established.
1. Go to the Insert menu and
select Database Results. That will start the wizard.
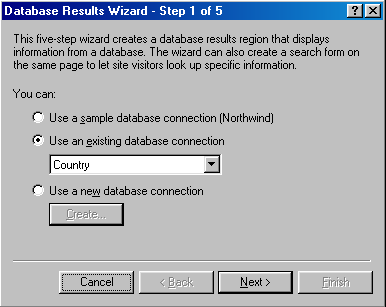 |
- If you wish to display the contents of
an existing database connection (that is, one you have already
established) select it from the pull-down menu under "Use an existing
database connection." All of the databases to which you
have made connections will be listed. Select the database you
wish to use and click
"Next >."
- If you do not
see the database listed that you want to use, click the radio button
to use a new database connection, then click on Create. (Click
here if you need a refresher on creating a database connection)
|
2. Select the record source (table) with the
fields/values you would like to display
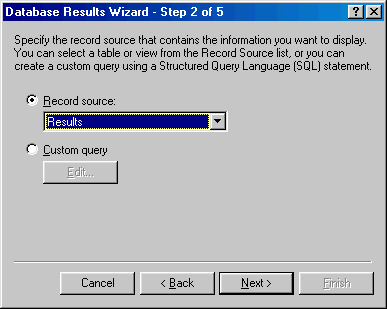 |
- Next, choose
the table you want to pull data from (e.g., "Results" or
"Africa").
- The dropdown menu under "Record Source:" will
list all tables and queries contained in the database you are using.
Select the source you wish to use and click "Next >".
- or -
- You can also
develop a custom query using SQL statements.
|
3. Select the field display
options you want on this Displaying Results web page.
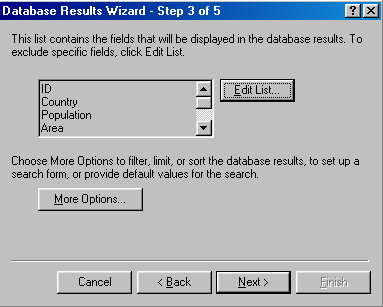 |
- Step 3 in the Database Results Wizard gives you several options
for selecting data to display. The list next to the "Edit
List..." button contains all the fields to be found in the database
table you have selected to use.
- You can accept
to display all the fields in your table, but usually you will want to
edit this list. You can choose which fields you
wish to display by clicking on the "Edit List..."
button.
- You can also
further refine a query by selecting More Options.
- Click More
Options now to see an explanation of these options.
|
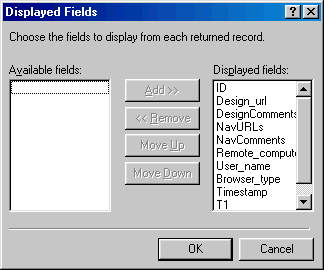 |
- This is the
Edit List window, and allows you to customize your data base results
region. Be careful not to display private information such as
Social Security numbers and Photos.
|
4. Select the display
format for your Results web page.
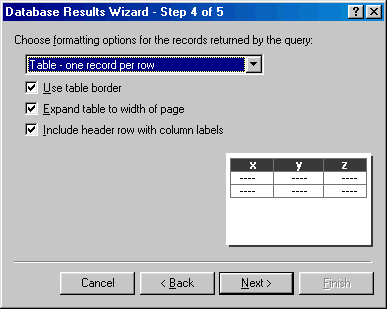 |
- You can
customize the way the data will appear on the page. Table is the
layout that is most typical (each "record" is a row and each
"field" is a column), but you may also wish to use
"List" on occasion.
- Select whether you wish the results to
be displayed in a border-less table (using the checkbox)
- Select whether you wish the table to
expand past the right margin of the page, if the values are long (I
would recommend not doing this, in general).
- If you want to have the first row list
the field names, select the checkbox next to "Include
header row with column labels."
|
5. Select how many
records per "group" you wish to display on your results web page.
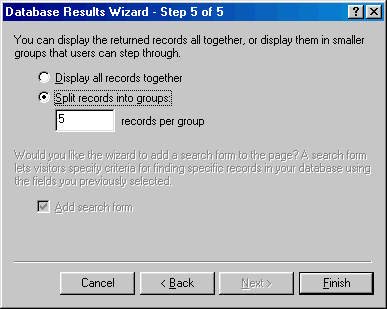 |
- You can display all the records at once, or divide
them into groups.
- If you choose
to divide the data into groups, FrontPage will automatically add
navigation controls to the page, so that users can browse through the
data.
- Notice the "Add
search form" check box. You can add a search form to the
results page if you wish but you may find it easier to build the
search form on a previous page.
By clicking on the "Finish" button you will produce a
database results region on your page. You must save the page as an
ASP page (use the .asp extension).
|


